How to Connect Salesforce & Google Drive: Step-by-Step Guide
Introduction
Picture this: it’s 9 p.m., you’re wrapping up a demo build, and a client pings—
Hey, can we get every file in Drive automatically?
You laugh, half-nervous, half-determined. Because yes… but not by hand.
That’s how this little project started. No middleware, no marketplace plug-in—just Apex, a Trigger, and a couple of OAuth calls.
By the time it worked, files were gliding from Salesforce straight into Drive folders like they’d been doing it forever.
Why Bother Integrating These Two?
Because people forget. They drag files into Salesforce, swear they’ll copy them to Drive later, and don’t. Next thing you know, you’re hunting a six-month-old contract named final_v8(1).pdf.
With this setup:
- You can open a Google Doc or Sheet right inside Salesforce and co-edit live. That moment—seeing two cursors typing in the same doc while a record’s open—still feels like magic.
- Files you attach in Salesforce quietly appear in Drive. You won’t even think about it after a day or two.
- Your reps stop digging through folders. They attach, move on, done.
- And version chaos? Gone. The Drive copy is the copy. Always.
Prerequisites (Things to Check Before You Get Excited)
- You’ve got a Salesforce Developer Org handy.
- Your Google Cloud Project already has the Drive API enabled.
- You’ve created OAuth 2.0 credentials in Google — yep, the Client ID and Client Secret.
Tick those off and you’re ready.
(If one’s missing, stop here; I promise it’ll save you frustration later.)
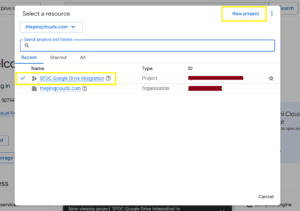
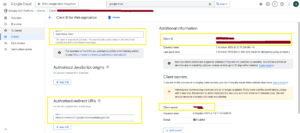
Step 1 – Turn On the Drive API and Grab Credentials
Crack open your Google Cloud Console — it’s probably still using the light theme.
- Create a project or pick one you’ve already abused for testing.
- Head to APIs & Services → Enable APIs → Google Drive API.
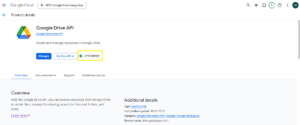
- Then slide into Credentials → Create Credentials → OAuth 2.0 Client ID.
- Choose Web Application.
- Scribble these down somewhere — not your sticky note app:
- Client ID
- Client Secret
- Client ID
Redirect URI: use https://developers.google.com/oauthplayground for now.


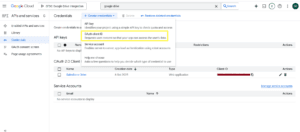
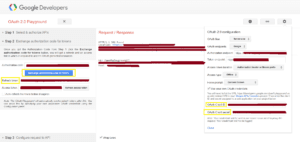
Step 2 – Get Your Access & Refresh Tokens
Jump to the Google OAuth Playground.
- Top-right gear ⚙️ → check Use your own OAuth credentials.
- Drop in your Client ID and Secret.
- Under Step 1, pick this scope:
https://www.googleapis.com/auth/drive - Authorize. Sign in. Swap the code for tokens.
Keep that Refresh Token like treasure — it’s the key that keeps Salesforce talking to Drive long after you log out.
(First time I did this, I lost it and spent an hour swearing at 401 errors.)

Step 3 – Add a Custom Field on Account
Every Account needs a parking spot in Drive. We’ll store that folder ID.
- Setup → Object Manager → Account → Fields & Relationships → New.
- Data Type: Text
- Field Label: Google Drive Folder ID
- API Name: Google_Drive_Folder_ID__c
That’s the handshake between record and folder.
Step 4 – The Apex Class
Here’s the Apex. Paste this in exactly—it’s the uploader that pushes Salesforce files to Drive.
public class GoogleDriveFileUploader {
private static final string DRIVE_UPLOAD_URL = 'https://www.googleapis.com/upload/drive/v3/files?uploadType=multipart';
private static final string ACCESS_TOKEN = 'Your_Access_Token';
@future(callout=true)
public static void uploadFileToDrive(String contentDocumentId, String parentRecordId){
try{
// Get file details
ContentVersion cv = [Select Id, Title, VersionData, FileExtension From ContentVersion Where ContentDocumentId =: contentDocumentId ORDER BY CreatedDate DESC LIMIT 1];
// Get Account details & folder Id
Account acc = [Select Id, Name, Google_Drive_Folder_ID__c From Account Where Id =: parentRecordId];
if(String.isBlank(acc.Google_Drive_Folder_ID__c)){
System.debug('No Drive Folder Id found for Account: ' + acc.Name);
return;
}
String mimeType = getMimeType(cv.FileExtension);
String metadata = '{"name": "' + cv.Title + '", "parents": ["' + acc.Google_Drive_Folder_ID__c + '"]}';
String boundary = '-------314159265358979323846';
String bodyStart = '--' + boundary + '\r\n'
+ 'Content-Type: application/json; charset=UTF-8\r\n\r\n'
+ metadata + '\r\n'
+ '--' + boundary + '\r\n'
+ 'Content-Type: ' + mimeType + '\r\n\r\n';
// Send HTTP request using HttpRequest#setBodyAsBlob
HttpRequest req = new HttpRequest();
req.setEndpoint(DRIVE_UPLOAD_URL);
req.setMethod('POST');
req.setHeader('Authorization', 'Bearer ' + ACCESS_TOKEN);
req.setHeader('Content-Type', 'multipart/related; boundary=' + boundary);
req.setBodyAsBlob(fullBodyBlob);
Http http = new Http();
HttpResponse res = http.send(req);
if(res.getStatusCode() == 200 || res.getStatusCode() == 201){
System.debug('File uploaded successfully: ' + res.getBody());
} else {
System.debug('File upload failed: ' + res.getStatus() + '-' + res.getBody());
}
} catch(Exception e){
System.debug('Upload Error: ' + e.getMessage());
}
}
// Helper method: map file extensions to MIME types
private static String getMimeType(String ext) {
if (String.isBlank(ext)) return 'application/octet-stream';
ext = ext.toLowerCase();
Map<String, String> mapMime = new Map<String, String>{
'pdf' => 'application/pdf',
'png' => 'image/png',
'jpg' => 'image/jpeg',
'jpeg' => 'image/jpeg',
'gif' => 'image/gif',
'txt' => 'text/plain',
'csv' => 'text/csv',
'doc' => 'application/msword',
'docx' => 'application/vnd.openxmlformats-officedocument.wordprocessingml.document',
'xls' => 'application/vnd.ms-excel',
'xlsx' => 'application/vnd.openxmlformats-officedocument.spreadsheetml.sheet',
'ppt' => 'application/vnd.ms-powerpoint',
'pptx' => 'application/vnd.openxmlformats-officedocument.presentationml.presentation'
};
return mapMime.containsKey(ext) ? mapMime.get(ext) : 'application/octet-stream';
}
}Step 5 – Trigger Time
This little Trigger listens for file uploads and calls the class.
trigger AccountFileToDriveTrigger on ContentDocumentLink (after insert) {
for(ContentDocumentLink cdl : Trigger.new){
// Check if file is linked to Account
if(cdl.LinkedEntityId != null && String.valueOf(cdl.LinkedEntityId).startsWith('001')){
GoogleDriveFileUploader.uploadFileToDrive(cdl.contentDocumentId, cdl.LinkedEntityId);
}
}
}Simple. Quiet. Effective.
Step 6 – Remote Site Settings
Salesforce likes to know who it’s talking to.
- Setup → Security → Remote Site Settings → New Remote Site.
- Remote Site Name: GoogleDriveAPI
- Remote Site URL: https://www.googleapis.com
- Save.
Now Salesforce won’t panic when you make that callout.
Step 7 – Test It
Make an Account. Attach a file. Count to five. Flip over to Google Drive.
There it is. The folder ID matched, the upload succeeded. You’ll feel that tiny thrill the first time it happens—every admin does.
Below is a demo video showcasing how the integration works.
Why This Matters
Time isn’t lost in big chunks—it leaks through tiny tasks. Manual uploads. Version confusion. Extra clicks. This patch plugs those leaks.
And for consulting partners, it’s a neat demo that shows what Apex + API can do without extra licensing. Clients love seeing a “no-app” solution that just works.
Next Steps
Run this in a sandbox first; see it behave.
Then dream a bit—
auto-create folders when new Accounts appear,
log upload histories,
or sort docs by type.
Once you’ve built one native integration like this, you start seeing ten more you could do.
Wrapping Up
A few lines of Apex, one Trigger, and a sprinkle of Google API—that’s all it takes to make Salesforce and Drive speak fluently. At The Pinq Clouds, we build things like this because small automations quietly multiply productivity.
