Introduction

Timely communication can make or break customer experiences. While email remains a standard channel, it is often delayed or ignored. SMS, on the other hand, typically reaches the customer within minutes and has one of the highest open rates in digital communication. By embedding SMS functionality into Salesforce, businesses can connect with their customers instantly and reliably.

Why Integrate Salesforce with Twilio?

Consider these scenarios where an automated SMS could save time and enhance customer satisfaction:

  • A new support case is created.
  • A payment confirmation is processed.
  • An appointment is scheduled or updated.

With a Salesforce–Twilio integration, such events can trigger personalized SMS notifications to customers in real time. This ensures faster responses, improved transparency, and fewer unnecessary support inquiries.

In this blog, We’ll walk you through how to Integrate Salesforce with Twilio so that whenever a Case is created or updated, Salesforce automatically sends an SMS to the related Contact’s mobile number. To make the integration flexible, we also used Custom Metadata to store configuration values like the Twilio Account SID and From Number.

Prerequisites

Before starting the setup, make sure you have:

  • An active Twilio account with an SMS-enabled number.
  • Your Twilio Account SID and Auth Token.
  • Access to a Salesforce org where you can configure Named Credentials, Apex Classes, and Triggers.

Step 1: Get Twilio Credentials

  1. Sign in or create an account on Twilio.
  2. Purchase or use an existing SMS-capable number.
  3. Copy your Account SID, Auth Token, and phone number. These will be used inside Salesforce.

Checkout the below screenshot where you will see Account SID, Auth Token and Your Twilio Number after buying from Twilio.

Step 2: Let’s Define External Credential (Must)

Before creating a Named Credential, You must define an External Credential to securely describe how Salesforce connects to the external services (Twilio).

  1. Go to Setup → External Credentials
  2. Create a new record with:
  3. Fill in:
    1. Label: Twilio Credential
    2. Name: Twilio_Credential
    3. Authentication Protocol: Basic Authentication
    4. Save and proceed to add a principal.

Step 2.1: Let’s Create Principals in Related External Credential

  1. Parameter Name – Twilio_Principal
  2. Sequence Number – 1
  3. Identity Type – Named Principal
  4. Username – Account_SID
  5. Password – Auth Token
  6. Click Save

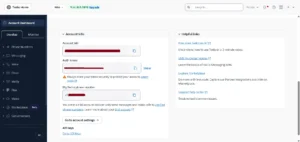
Step 3: Create a Named Credential

  1. Go to Setup → Named Credentials
  2. Click New Named Credential
  3. Configure as follows:
    1. Label – TwilioAPI
    2. Name – TwilioAPI
    3. URL – https://api.twilio.com
    4. Enable for Callouts – Enabled
    5. External Credential – Twilio_Credential
    6. Generate Authorization Header – Checked
    7. This allows Apex code to call Twilio without exposing sensitive credentials.

Checkout the below screenshot to see how this Named Credential looks:

Step 4: Let’s Assign Credential Access via Profile

Update the user profile (e.g., System Administrator) to grant access to the new External Credential.

  1. Go to Setup → Profiles
  2. Choose the System Administrator profile (or your active user’s profile)
  3. Under Enabled External Credential Principal Access, click Edit
  4. Add Your External Credential and click Save

Now your org can use the Named Credential connected to this External Credential.

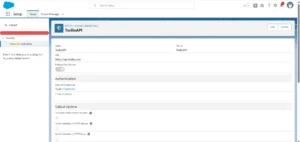
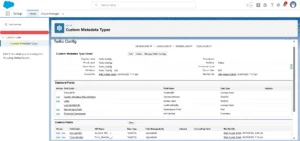
Step 5: Store Config in Custom Metadata

Instead of hardcoding Twilio details into Apex, store them in Custom Metadata:

  1. Go to Setup → Custom Metadata Types → New Custom Metadata Type.
    • Label: Twilio Config
    • Object Name: Twilio_Config
  2. Add Custom Fields:
    • From_Number__c (Text) → your Twilio phone number
    • Account_SID__c (Text) → your Twilio Account SID
  3. Create a record for this metadata type and fill in your Twilio details.

This way, your Apex classes can dynamically reference these values.

Checkout the below screenshot to see how this Custom Metadata looks like:

Step 6: Let’s Create Apex Class for Sending SMS

Create a reusable service class to handle SMS sending

This class contains a future method that will be invoked from the Case trigger.

public with sharing class SMSIntegrationService {

    private static final String NAMED_CREDENTIAL = 'callout:TwilioAPI';
    
    private static Twilio_Config__mdt getConfig(){
        return [ Select From_Number__c, Account_SID__c FROM Twilio_Config__mdt LIMIT 1];
    }

     @future (callout=true)
    public static void sendSMSAsync(String toNumber, String message) {

        try{
            Twilio_Config__mdt config = getConfig();
            String fromNumber = config.From_Number__c;
            String accountSid = config.Account_SID__c;
            
            Http http = new http();
            HttpRequest request = new HttpRequest();
            request.setEndpoint(NAMED_CREDENTIAL + '/2010-04-01/Accounts/' + accountSid + '/Messages.json');
            request.setMethod('POST');
            request.setHeader('Content-Type', 'application/x-www-form-urlencoded');

            String body = 'To=' + EncodingUtil.urlEncode(toNumber, 'UTF-8') +
                          '&From=' + EncodingUtil.urlEncode(fromNumber, 'UTF-8') +
                          '&Body=' + EncodingUtil.urlEncode(message, 'UTF-8');

            request.setBody(body);
            HttpResponse response = http.send(request);

            System.debug('Twilio SMS API Response Code: ' + response.getStatusCode());
            System.debug('Twilio SMS API Response Body: ' + response.getBody());

            if(response.getStatusCode() == 201){
                System.debug('SMS sent Successfully' + response.getBody());
            }else{
                System.debug('Error sending SMS' + response.getBody());
            }
        } catch(Exception e){
            System.debug('Error sending SMS' + e.getMessage());
        }
    }
}

Step 7: Let’s Create a Apex Handler class

Create a handler to check for status changes in cases and trigger SMS notifications:

This apex class checks if a Case is updated, fetches the related Contact’s mobile number, and calls the future method.

public with sharing class CaseSMSHandler {
    public static void updateCaseStatus(List<Case> newCases, Map<Id, Case> oldCaseMap) {

        Set<Id> contactIds = new Set<Id>();
        Map<Id, Case> caseToNotify = new Map<Id, Case>();
       // List<Case> caseToNotify = new List<Case>();

        for(Case c: newCases){
            Case oldCase = oldCaseMap.get(c.Id);
            if(c.Status != oldCase.Status && c.ContactId != null){
                contactIds.add(c.ContactId);
                caseToNotify.put(c.ContactId, c);
            }
        }

            if (!contactIds.isEmpty()) {
            Map<Id, Contact> contactMap = new Map<Id, Contact>(
                [SELECT Id, MobilePhone FROM Contact WHERE Id IN :contactIds]
            );

                   // Send SMS for each Case where Contact has MobilePhone
            for (Id contactId : caseToNotify.keySet()) {
                Contact con = contactMap.get(contactId);
                if (con != null && String.isNotBlank(con.MobilePhone)) {
                    Case c = caseToNotify.get(contactId);
                    String msg = 'Hello, your Case ' + c.CaseNumber + 
                                 ' status changed to: ' + c.Status;
                    TwilioSMSService.sendSMSAsync(con.MobilePhone, msg);
                }
            }
        }
    }
}

Step 8: Now, Let’s Add a Case Trigger

Finally, wire everything together with a trigger:

trigger CaseSMSTrigger on Case (after update) {
    CaseSMSHandler.updateCaseStatus(Trigger.new, Trigger.oldMap);
}

Step 9: Test Your Integration

  1. Open a Case record in Salesforce.
  2. Update the Status field.
  3. Review the Debug Logs → you’ll see Twilio API response.
  4. Verify the customer’s mobile phone receives the SMS.

Checkout the below video to see how this Integration works:

Conclusion

With this integration in place, Salesforce becomes more than a case management tool—it becomes a direct communication channel. Every status change results in a proactive SMS notification, reducing uncertainty and improving customer confidence.

This project showed me how powerful small automations can be:

  • It cuts down support calls (“Has my case been updated yet?”).
  • It makes customers feel more connected and informed.
  • It’s lightweight and doesn’t need any middleware.

By combining Salesforce automation with Twilio’s SMS API, your team can deliver real-time updates that truly enhance the customer journey.

Ready to take your Salesforce automations to the next level? Our team at The Pinq Clouds can help you design, implement, and optimize custom integrations that make your CRM smarter and your customer experience smoother. Reach out to us today—and follow along for more practical Salesforce guides, tips, and updates.