Salesforce + Calendly Integration: A Step-by-Step Guide
Sales is basically a race these days—blink, and you miss the deal. Nobody’s got time for endless emails just to pick a meeting slot. Enter Calendly. It’s like that friend who handles all the annoying group chat scheduling so you don’t have to bother about it at all.
Now, when you integrate Calendly with Salesforce, every meeting, every reschedule, etc. slides right into your CRM system, giving the Sales team(s) a holistic view of customer interactions. No more call-logging panic.
Grab the Calendly package for Salesforce from AppExchange. I am about to walk you through how it is to be set up while also tossing in some real-life tips so you don’t trip over the basics.
Why Integrate Calendly with Salesforce?
Well, let me spell it out—because doing stuff twice is time-consuming and mundane. Seriously, who wants to punch in the same info over and over? Here’s the deal:
- Automatic Lead Creation:
Yeah, so when someone books a meeting on Calendly, a new lead is created in Salesforce. No extra clicks. - See Your Customer From All Angles:
Every meeting you book? It lands neatly under the right Lead or Contact. No more “Wait, who’s this again?” moments. - Make Sales Actually Efficient:
You’re not here to be a data monkey. This setup keeps your pipeline fresh without all the grunt work. More selling, less typing. - Everything Looks the Same:
Everyone on the team tracks meetings the same way. No more weird, home-brewed and old systems.
Step 1: Get Your Calendly Act Together
Before you even look at Salesforce, make sure your Calendly is ready to roll. Seriously, just go to calendly.com & create your account.
- Create a Calendly Account at calendly.com.
- Set up your organization, invite users, and define roles.
- Configure Event Types (e.g., Demo Call, Discovery Meeting, Support Session).
- Connect your calendar system (Google, Outlook, Microsoft 365, etc.).
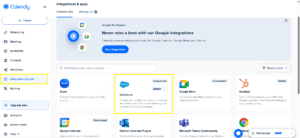
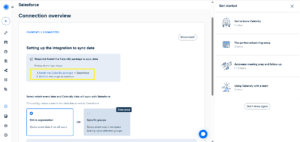
Step 2: Integrate it with Salesforce
- Go to Integrations & apps in the left corner of the page.
- Click on Salesforce and connect it.
- Click on Connect Salesforce
- Now your Salesforce account is connected with Calendly.
Check out in the Screenshot below.
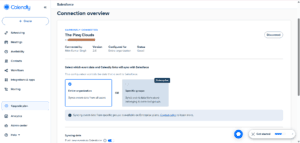
After that you will see screen like this below which shows the Connected account and status
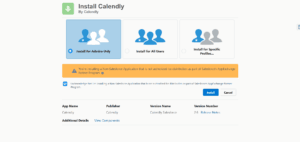
Step 3: Install the Calendly Package
After connecting the Calendly with Salesforce Account you will see a screen of saying Install the Calendly package in salesforce.
Check out the below screenshot:
Now select the Install for Admins only and then install.
It will be installed in your system in a few min.
Check out the below screenshot:
Step 4: Activate some Calendly Managed Package Flows
- Go to Setup → Quick Find Box → Flows
- Activate the below Flows in your org:
- CreateEventTemplate
- Create Event Attendee Template
- CancelEventTemplate
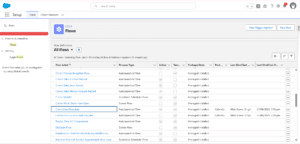
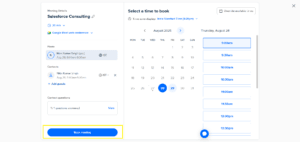
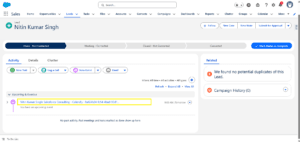
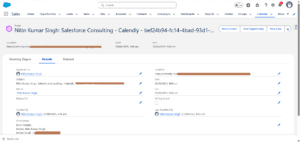
Step 5: Create an Event in Calendly
Create an event from Calendly and it will be saved as a lead in Salesforce and to related that it will also create event.
Check out the below screenshot:
Conclusion:
Syncing Calendly with Salesforce is like giving your sales team a brain upgrade. Less admin, more closing deals. Data stays clean, everyone’s on the same page, and nobody’s stuck playing detective just to see what’s going on with a customer.
Follow the steps above, and you’ll have a fully functional Calendly-Salesforce integration that enhances productivity, improves data accuracy, and elevates the customer experience.
Want expert help with Salesforce integrations? Connect with The Pinq Clouds today and let us simplify your CRM journey. Don’t forget to follow us for more Salesforce tips, guides, and updates.