Salesforce Stripe Integration Using Payment Intents API
In today’s fast-paced digital economy, businesses need a quick and reliable way to accept payments directly from their CRM. Salesforce, the world’s #1 CRM platform, when integrated with Stripe, one of the most popular payment processors, creates a powerful synergy.
This integration allows sales teams to collect payments without leaving Salesforce, automate transaction records, and offer a smooth checkout experience to customers — all in real time.
In this blog, we’ll walk through how to integrate Stripe’s Payment Intents API into Salesforce using Apex, Lightning Web Components (LWC), and Stripe.js. You’ll learn how to:
- Store API keys securely in Custom Metadata
- Create Payment Intents in Stripe via Apex
- Collect card details using Stripe.js in LWC
- Confirm payments in real-time
- Add optional enhancements like billing details, redirects, and recurring payments
Why Businesses Need Salesforce–Stripe Integration
- Faster Payment Processing – No need to switch between platforms; charge customers instantly from Salesforce.
- Better Customer Experience – Provide a professional checkout flow within your CRM.
- Centralized Data – Store payment details in Salesforce for future insights and reporting.
- Automation Ready – Trigger workflows, approvals, or notifications when a payment is processed.
Integration Overview
Our goal was simple:
- Accept card payments directly in Salesforce via a custom Lightning Web Component.
- Use Stripe’s Payment Intents API to securely handle payments.
- Save transaction details in a custom Salesforce object for tracking and analytics.
Overview of the Salesforce–Stripe Payment Flow
Here’s the flow we’ll be building:
- Apex securely calls Stripe’s Payment Intents API.
- Stripe Secret Key is stored in Custom Metadata.
- LWC renders a Stripe.js card input for secure payment collection.
- Client-side confirmation with
stripe.confirmCardPayment()using theclient_secret. - Real-time payment status is shown to the user.
Prerequisites
Before starting, you’ll need:
- A Salesforce Developer org
- A Stripe account (free to sign up)
- LWC – Front-end UI for payment form.
- Apex – Server-side callouts to Stripe API.
- Stripe Publishable Key and Secret Key from:
Stripe Dashboard → Developers → API Keys - CSP Trusted Site entry for
https://js.stripe.com(Setup → CSP Trusted Sites). - Custom Object – Save transaction history in Salesforce.
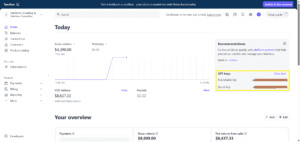
Check out below screenshot to view Publishable & Secret key in Stripe.

Storing Stripe API Keys Securely
Instead of hardcoding keys in the LWC, we used Custom Metadata (Stripe_Configuration__mdt) to store:
Publishable_Key__c– Used in LWC for Stripe.js.Secret_Key__c– Used in Apex for secure API calls.
This ensures credentials are managed centrally and securely.
Payment Flow We Implemented
- User enters payment details (amount, currency, billing info) in LWC.
- LWC fetches the Stripe Publishable Key from Apex.
- Stripe.js securely collects card information and generates a Payment Method.
- Apex creates a Payment Intent via Stripe’s API using the secret key.
- LWC confirms payment using
stripe.confirmCardPayment()with the client secret. - Apex saves transaction details in
Stripe_Transaction__ccustom object. - UI shows success message & spinner during processing for a smooth experience.
User Experience Highlights
- Spinner / Loading State – Prevents duplicate clicks and improves UX.
- Success Toast – Instant confirmation when payment succeeds.
- Error Handling – Clear messages if card is declined or invalid.
Step-by-Step Implementation Guide
Step 1: Create Custom Metadata Type
Stripe_Configuration__mdtwith fields:Publishable_Key__c(Text)Secret_Key__c(Text)Webhook_Secret__c(Text)
Create a record (e.g.
Test_Stripe_Configuration) and set test keys.Step 2: Create Named Credential
- Label/Name:
StripeAPI - URL:
https://api.stripe.com - Store
Secret Keyin Custom Headers
- Label/Name:
Step 3: Create Custom Object
Stripe_Transaction__cwith fields:Amount__c(Number)Currency__c(Text)Payment_Intent_Id__c(Text)Billing_Name__c(Text)Billing_Email__c(Email)Status__c(Text) — optional
Step 4: CSP Trusted Sites
- Add trusted URL
https://js.stripe.comwith contexts: Lightning Components, Lightning Locker, Communities.
- Add trusted URL
Step 5: Apex Controller to Create Payment Intent
public with sharing class StripePaymentController {
// Helper: get secret from custom metadata
private static String getStripeSecretKey() {
Stripe_Configuration__mdt config = Stripe_Configuration__mdt.getInstance('Test_Stripe_Configuration');
if (config == null || String.isEmpty(config.Secret_Key__c)) {
throw new AuraHandledException('Stripe Secret key is not configured');
}
return config.Secret_Key__c;
}
// 1) Create Payment Intent and return full JSON string (includes client_secret)
@AuraEnabled
public static String createPaymentIntent(
Decimal amount,
String currencyCode,
String billingName,
String billingEmail
) {
String secretKey = getStripeSecretKey();
HttpRequest req = new HttpRequest();
req.setEndpoint('callout:StripeAPI/v1/payment_intents');
req.setMethod('POST');
req.setHeader('Authorization', 'Bearer ' + secretKey);
req.setHeader('Content-Type', 'application/x-www-form-urlencoded');
// amount converted to cents
Integer amountInCents = Integer.valueOf((amount == null) ? 0 : (amount.multiply(100)).intValue());
String body = 'amount=' + String.valueOf(amountInCents)
+ '¤cy=' + EncodingUtil.urlEncode(currencyCode, 'UTF-8')
+ '&payment_method_types[]=card'
+ '&description=' + EncodingUtil.urlEncode('Payment from ' + billingName, 'UTF-8')
+ '&receipt_email=' + EncodingUtil.urlEncode(billingEmail, 'UTF-8')
+ '&metadata[billing_name]=' + EncodingUtil.urlEncode(billingName, 'UTF-8')
+ '&metadata[billing_email]=' + EncodingUtil.urlEncode(billingEmail, 'UTF-8');
req.setBody(body);
Http http = new Http();
HttpResponse res = http.send(req);
if (res.getStatusCode() == 200 || res.getStatusCode() == 201) {
return res.getBody();
} else {
// bubble up stripe error to UI
throw new AuraHandledException('Stripe Error: ' + res.getBody());
}
}
// 2) Save Stripe transaction record in Salesforce
@AuraEnabled
public static void saveStripeTransaction(String amount, String currencyCode, String paymentIntentId, String billingName, String billingEmail) {
Stripe_Transaction__c tx = new Stripe_Transaction__c();
tx.Amount__c = (amount == null) ? null : Decimal.valueOf(amount);
tx.Currency__c = currencyCode;
tx.Payment_Intent_Id__c = paymentIntentId;
tx.Billing_Name__c = billingName;
tx.Billing_Email__c = billingEmail;
insert tx;
}
// 3) Provide publishable key to LWC (cacheable)
@AuraEnabled(cacheable=true)
public static String getStripePublishableKey() {
Stripe_Configuration__mdt config = Stripe_Configuration__mdt.getInstance('Test_Stripe_Configuration');
if (config == null || String.isEmpty(config.Publishable_Key__c)) {
throw new AuraHandledException('Stripe Publishable key is not configured');
}
return config.Publishable_Key__c;
}
}6. Step 6: LWC HTML – Payment Form
- Form fields for amount, currency, billing name/email, and card input container for Stripe.js.
<template>
    <lightning-card title="Stripe Payment">
        <div class="slds-p-around_medium">
            <lightning-input name="amount" label="Amount" type="number" value={amount} onchange={handleInputChange} required></lightning-input>
            <lightning-input name="currencyCode" label="Currency (e.g., usd)" type="text" value={currencyCode} onchange={handleInputChange} required></lightning-input>
            <lightning-input name="billingName" label="Billing Name" type="text" value={billingName} onchange={handleInputChange} required></lightning-input>
            <lightning-input name="billingEmail" label="Billing Email" type="email" value={billingEmail} onchange={handleInputChange} required></lightning-input>

            <div class="slds-m-top_medium card-element" style="border:1px solid #ccc; padding:12px; border-radius:4px;"></div>

            <div class="slds-m-top_medium">
                <lightning-button variant="brand" label="Pay Now" onclick={handlePay} disabled={isLoading}></lightning-button>
            </div>

            <template if:true={isLoading}>
                <div class="slds-spinner_container slds-m-top_small">
                    <div role="status" class="slds-spinner slds-spinner_medium slds-spinner_brand">
                        <span class="slds-assistive-text">Loading</span>
                        <div class="slds-spinner__dot-a"></div>
                        <div class="slds-spinner__dot-b"></div>
                    </div>
                </div>
            </template>

            <template if:true={paymentStatus}>
                <div class="slds-text-color_success slds-m-top_medium">{paymentStatus}</div>
            </template>

            <template if:true={error}>
                <div class="slds-text-color_error slds-m-top_medium">Error: {error}</div>
            </template>
        </div>
    </lightning-card>
</template>
7. Step 7: LWC JavaScript – Integrating Stripe.js
- Load Stripe.js dynamically.
- Fetch publishable key from Apex.
- Collect card details with Stripe Elements.
- Call Apex to create Payment Intent.
- Use
stripe.confirmCardPayment()to complete payment.
import { LightningElement, track } from 'lwc';
import { loadScript } from 'lightning/platformResourceLoader';

import createPaymentIntent from '@salesforce/apex/StripePaymentController.createPaymentIntent';
import saveStripeTransaction from '@salesforce/apex/StripePaymentController.saveStripeTransaction';
import getStripePublishableKey from '@salesforce/apex/StripePaymentController.getStripePublishableKey';
import { ShowToastEvent } from 'lightning/platformShowToastEvent';

const STRIPE_JS = 'https://js.stripe.com/v3/';

export default class StripePayment extends LightningElement {
    @track amount;
    @track currencyCode = 'usd';
    @track billingName;
    @track billingEmail;

    @track error;
    @track paymentStatus;
    @track isLoading = false;

    stripe;
    card;
    stripeInitialized = false;

    renderedCallback() {
        if (this.stripeInitialized) return;

        // Load Stripe.js and fetch publishable key in parallel
        Promise.all([
            loadScript(this, STRIPE_JS),
            getStripePublishableKey()
        ])
        .then(([_, publishableKey]) => {
            this.stripe = Stripe(publishableKey);
            const elements = this.stripe.elements();
            this.card = elements.create('card', {
                hidePostalCode: true,
                style: {
                    base: {
                        fontSize: '16px',
                        color: '#32325d',
                        '::placeholder': { color: '#aab7c4' }
                    },
                    invalid: { color: '#fa755a', iconColor: '#fa755a' }
                }
            });

    handleInputChange(evt) {
        const { name, value } = evt.target;
        // Keep mapping safe and explicit
        if (name === 'amount') this.amount = value;
        if (name === 'currencyCode') this.currencyCode = value.toLowerCase();
        if (name === 'billingName') this.billingName = value;
        if (name === 'billingEmail') this.billingEmail = value;
    }

    async handlePay() {
        this.error = null;
        this.paymentStatus = null;
        this.isLoading = true;

        // Basic validation
        if (!this.amount || !this.currencyCode || !this.billingName || !this.billingEmail) {
            this.error = 'Please fill all required fields.';
            this.isLoading = false;
            return;
        }

        try {
            // 1) Create PaymentIntent on server
            const response = await createPaymentIntent({
                amount: parseFloat(this.amount),
                currencyCode: this.currencyCode,
                billingName: this.billingName,
                billingEmail: this.billingEmail
            });


            if (confirmResult.error) {
                // show Stripe error
                this.error = confirmResult.error.message;
                this.dispatchEvent(new ShowToastEvent({
                    title: 'Payment failed',
                    message: this.error,
                    variant: 'error'
                }));
            } else if (confirmResult.paymentIntent && confirmResult.paymentIntent.status === 'succeeded') {
                const paymentIntentId = confirmResult.paymentIntent.id;
                // 3) Save transaction in Salesforce
                await saveStripeTransaction({
                    amount: this.amount.toString(),
                    currencyCode: this.currencyCode,
                    paymentIntentId: paymentIntentId,
                    billingName: this.billingName,
                    billingEmail: this.billingEmail
                });

                this.paymentStatus = '💰 Payment successful!';
                this.dispatchEvent(new ShowToastEvent({
                    title: 'Success',
                    message: 'Payment completed and saved',
                    variant: 'success'
                }));
            } else {
                this.error = 'Payment did not complete.';
            }
        } catch (err) {
            console.error('Payment error', err);
            this.error = err?.body?.message || err.message || String(err);
            this.dispatchEvent(new ShowToastEvent({
                title: 'Error',
                message: this.error,
                variant: 'error'
            }));
        } finally {
            this.isLoading = false;
        }
    }
}
8. Step 8: Add stripe.Payment.js-meta.xmlfile
<?xml version="1.0" encoding="utf-8"?>
<LightningComponentBundle xmlns="http://soap.sforce.com/2006/04/metadata">
    <apiVersion>64.0</apiVersion>
    <isExposed>true</isExposed>
    <targets>
        <target>lightning__RecordPage</target>
        <target>lightning__AppPage</target>
        <target>lightning__HomePage</target>
    </targets>
</LightningComponentBundle>
9. Step 9: Test the integration
- Open a Lightning App Page or Record Page with the LWC.
- Enter test values (Amount, Currency
USD, Billing Name/Email). - For card details in the Stripe card input use below Stripe test cards with any future expiry and CVC:
| 💳 Card Number | 📄 Description |
|---|---|
| 4242 4242 4242 4242 | Successful payment |
| 4000 0025 0000 3155 | Requires authentication |
| 4000 0000 0000 9995 | Payment declined |
Final Result
You’ve successfully built a fully functional Stripe payment flow right inside Salesforce — featuring secure API calls, real-time payment confirmation, and transaction logging for complete visibility.
Watch the demo video below to see the integration in action:
Conclusion
This integration brings secure, frictionless payments directly into the core of Salesforce — no external tools, no manual workarounds. By keeping API keys safe on the server, following Stripe’s SCA-ready Payment Intents best practices, and logging transactions directly in Salesforce, you ensure every payment is compliant, trackable, and automation-ready.
Whether you’re managing subscriptions, handling one-time purchases, or accepting donations, this setup keeps your data perfectly in sync, boosts operational efficiency, and delivers a seamless customer experience — all without leaving your CRM.
With Salesforce and Stripe working together, your CRM transforms into a complete sales, payment, and revenue powerhouse.
Thinking about implementing a similar integration? Now’s the perfect time to bridge the gap between your CRM and payments — and take your customer journey to the next level. Contact The Pinq Clouds today!


